Traefik Wildcard Certs with Linode DNS
So I've covered in another tutorial how to set up Traefik with Docker Compose. In that post, we were able to set up Traefik to use Let's Encrypt as a cert resolver and perform HTTP challenges. But what about DNS challenges? Specifically, Linode DNS challenge and with Wildcard Certs?
Linode Token
Before we can started on a Docker Compose file, you're going to need to create a token. This token you can get from your Linode admin panel. With this token, you will be giving Traefik special permissions to your Linode services. In this case, we will need to give Traefik permission to read and write domains.
To get started, go to Linode and log in. If you do not have an account yet, you'll obviously need one to continue.
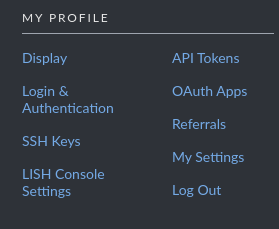
Once you are logged in, in the top right corner you will see your profile. Click your profile and click API Tokens.

After clicking API Tokens, you should at the profile menu in the API Tokens tab.

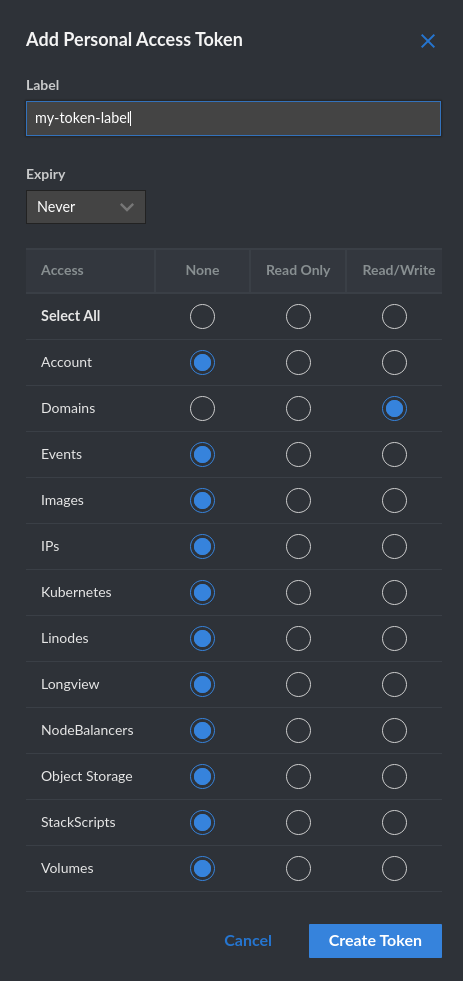
Click Create A Personal Access Token, and give your token a personalised label. Set the token to never expire, and then give it read and write permissions for Domain. Do NOT give this token any extra/uncessesary permissions. It is typically a bad practice to create tokens with lots of permissions. If a token somehow gets stolen in the event of a token with excessive permissions, a malicious user can do more damage the more permissions the token provides.

After you create the token, you will be provided a window with your token. Keep this token somewhere safe, as this token will not be shown again after closing the window.
Docker Compose
Now that we have our Linode token ready, lets get started with the docker compose file.
version: "3.9"

networks:
  public-network:
    name: public
    driver: bridge

volumes:
  network-logs:
    name: traefik-logs
  certs-volume:
    name: traefik-certs

services:
  traefik:
    image: traefik:v2.4
    container_name: traefik
    restart: unless-stopped
    volumes:
      - /var/run/docker.sock:/var/run/docker.sock:ro
      - certs-volume:/letsencrypt
      - network-logs:/var/log/
    networks:
      - public-network
    environment:
      - LINODE_TOKEN=CHANGE_ME # Get Linode API token
    command:
      - --certificatesresolvers.letsencrypt.acme.dnschallenge=true
      - --certificatesresolvers.letsencrypt.acme.dnschallenge.provider=linode
      - --certificatesresolvers.letsencrypt.acme.email=CHANGE_ME # Domain's email
      - --certificatesresolvers.letsencrypt.acme.storage=/letsencrypt/acme.json
      - --entrypoints.web.address=:80
      - --entrypoints.web.http.redirections.entrypoint.to=websecure
      - --entrypoints.web.http.redirections.entrypoint.scheme=https
      - --entrypoints.websecure.address=:443
      - --entrypoints.websecure.http.tls=true
      - --entrypoints.websecure.http.tls.certResolver=letsencrypt
      # You can add more domains by incrementing the domains array value.
      - --entrypoints.websecure.http.tls.domains[0].main=CHANGE_ME.com # Change to your domain
      - --entrypoints.websecure.http.tls.domains[0].sans=*.CHANGE_ME.com # Change to your domain
      - --log=true
      - --log.level=DEBUG
      - --log.filepath=/var/log/traefik.log
      - --providers.docker=true
      - --providers.docker.exposedbydefault=false
      - --providers.docker.network=public
This compose looks very similar to the one from the HTTP Challenge, but with a few additions. The first difference you'll notice is the environment variable LINODE_TOKEN. This is where you're Linode token is placed. If you prefer to not put this token inside your compose file, you can create a .env file with this token inside, or reference an environment variable from the host machine.
The first two commands of this stack have changed as well
      - --certificatesresolvers.letsencrypt.acme.dnschallenge=true
      - --certificatesresolvers.letsencrypt.acme.dnschallenge.provider=linode
These commands enable DNS challenge and set Linode as the DNS challenge provider.
In the next two commands, we will set our domain and specify a wildcard as the subdomains.
      - --entrypoints.websecure.http.tls.domains[0].main=CHANGE_ME.com # Change to your domain
      - --entrypoints.websecure.http.tls.domains[0].sans=*.CHANGE_ME.com # Change to your domain
In this section of the compose file, update CHANGE_ME to your actual domain.
You'll also notice the domains key word has a number in a pair of brackets. This is because you can set multiple domains to a single Traefik container if you increment this value by one.
For example, you can set two Wildcard domains like this:
      - --entrypoints.websecure.http.tls.domains[0].main=DOMAIN_ONE.com
      - --entrypoints.websecure.http.tls.domains[0].sans=*.DOMAIN_ONE.com
      - --entrypoints.websecure.http.tls.domains[1].main=DOMAIN_TWO.com
      - --entrypoints.websecure.http.tls.domains[1].sans=*.DOMAIN_TWO.com
Lastly, make sure you have your domain pointing to the IP address of Traefik's host machine.
I hope this tutorial helped you with your Wildcard certifications!
